Bioinformatics_Overview
Practical 5 - Quality Control continued
By Chelsea Matthews
- 1. Introduction
- 2. Fastp
- 3. Quality control post-trimming
- 4. Building a script
- 5. Summary of progress
1. Introduction
This is the second part of our read alignment and variant calling workflow where we are trying to determine the genotype of three individuals at the SNP rs4988235 which predicts lactose tolerance. Click here if you want to remind yourself of the background information.
In the last practical we assessed the quality of Illumina reads using FastQC and talked about some of the errors or artifacts specific to Illumina sequencing. Today we’ll cover the remainder of the Quality Control phase. We’ll also look at a scripting example.
1.1 Overview of today
Today we will trim our data to remove artifacts, adapters, and low quality base calls and run FastQC again to see what our data looks like after trimming.
We need to remove adapters because they don’t match any part of the sequenced genome and this will make read alignment more challenging, and low quality stretches of sequence are removed as they are more likely to contain sequencing errors and therefore, may not accurately represent the sequenced genome.
Trimming can also remove some sequencing artifacts, like polyG artifacts.
Even if the report from FastQC shows that you have good quality data, it is still best-practice to trim.
1.2 Learning Outcomes
- Learn how to perform adapter and quality trimming
- Learn how to build a script
- Learn why it is useful to build a script
1.3 Setup and Catchup
Let’s activate our bioinf conda environment again.
cd ~/Practical_alignment
source activate bioinf
We are working in the ~/Practical_alignment directory again today and will be using the same data as in the last practical.
If you didn’t complete the last practical, running the script below will make sure that you are up to date.
To run the script:
- Type
nano catchup_prac5.shto make a new bash script. - Paste the entire script below into it and save it by:
- Hold down
Ctrland typex - Type
ywhen you see the messageSave modified buffer?at the bottom of the screen (this is just asking if you want to save the file) - Press enter when you see
File Name to Write: catchup.shat the bottom of the screen. This just means that you are saving the file ascatchup.sh
- Hold down
- Run the script with
bash catchup_prac5.sh
#!/bin/bash

# load software
source activate bioinf

# create all directories and move into project directory
mkdir --parents ~/Practical_alignment/{ref,0_raw,1_trim,2_align,3_variants}
mkdir -p ~/Practical_alignment/0_raw/FastQC
mkdir -p ~/Practical_alignment/1_trim/{fastp,FastQC}

cd ~/Practical_alignment

# Get data
## make symlinks
ln -s ~/data/intro_ngs/*.fq.gz 0_raw/
# get reference
cp  ~/data/intro_ngs/chr2_sub.fa ref/

## Run Fastqc
fastqc -o 0_raw/FastQC -t 2 0_raw/ERR3241917_*.fq.gz
2. Fastp
There are many tools available for trimming.
We are going to be using fastp in this practical. The tool trimmomatic (see here) would be a good alternative.
Let’s run it on our first sample and then discuss the code.
mkdir -p ~/Practical_alignment/1_trim/fastp

fastp --thread 2 -i 0_raw/ERR3241917_1.fq.gz -I 0_raw/ERR3241917_2.fq.gz -o 1_trim/ERR3241917_1.fq.gz -O 1_trim/ERR3241917_2.fq.gz --unpaired1 1_trim/ERR3241917_1_orphans.fq.gz --unpaired2 1_trim/ERR3241917_2_orphans.fq.gz --cut_right --cut_window_size 4 --cut_mean_quality 20 --length_required 75 --html 1_trim/fastp/ERR3241917_fastp.html
The command will take a minute or two to run. It doesn’t provide any output while running so don’t worry. Just wait.
To make the fastp command easier to understand, it is shown below re-formatted like we might find in a bash script.
fastp --thread 2 \
-i 0_raw/ERR3241917_1.fq.gz \
-I 0_raw/ERR3241917_2.fq.gz \
-o 1_trim/ERR3241917_1.fq.gz \
-O 1_trim/ERR3241917_2.fq.gz \
--unpaired1 1_trim/ERR3241917_1_orphan.fq.gz \
--unpaired2 1_trim/ERR3241917_2_orphan.fq.gz \
--cut_right \
--cut_window_size 4 \
--cut_mean_quality 20 \
--length_required 75 \
--html 1_trim/fastp/ERR3241917_fastp.html
Fastp requires both R1 and R2 fastq files as input and creates four output files. Two files contain the trimmed paired reads (-o and -O options) and two files contain unpaired reads, or orphan reads.
What are orphan/unpaired reads?
- When paired-end reads are trimmed, sometimes one read doesn't meet the minimum quality requirements to be retained while the other does. This read is therefore discarded and the read that remains is now considered an Orphan read, or an unpaired read.
Fastp detects and removes adapters from reads by default so we don’t have to specifically tell it to do this and the remaining parameters/options in the fastp command are for quality trimming.
Quality trimming is often done using a sliding window.
This works by moving a small “window” along each read and checking the average quality score of the bases inside that window.
In this case, the window is 4 bp wide (--cut_window_size) and bases are trimmed if the average quality in the window is less than 20 (--cut_mean_quality).
The --cut_right option means that the window starts at the 3’ end of the read and --length_required 75 indicates that if a read is less than 75bp long after trimming and removing adapters, it should be discarded.
If a read is discarded but its pair is not, its pair will be sent to the orphan read file.
3. Quality control post-trimming
To assess how the trimming has performed, run FastQC on the paired reads output by fastp.
mkdir -p ~/Practical_alignment/1_trim/FastQC

fastqc -o 1_trim/FastQC -t 2 1_trim/ERR3241917_*.fq.gz
Take a look at the FastQC report files and compare them with the reports from the raw data.
- What is the minimum length of the trimmed reads?
- How many read pairs remain?
- How much sequence was lost to trimming and orphan reads?
We can also look at the .html report produced by fastp for more detailed information on trimming. Open it and find the answers to the following:
- What is the mean read length after filtering?
- How many reads were removed because they were of low quality?
- How many reads were removed because they were too short after trimming?
The data we’re using for this practical is very good quality and there weren’t any obvious problems in the FastQC report for the raw, untrimmed data. However, it still contained some low quality data which trimming was able to remove. FastQC reports give an indication of data quality but data that appears to be of very high quality can still contain some low quality reads. This is why we should always trim reads and remove adapters as part of quality control.
4. Building a script
The way you have been running this analysis so far (running commands directly in the terminal) is great for learning how to use new tools and for working out how you will analyse your data. It’s how most of the practicals are set up. However, bioinformaticians often need to analyse hundreds, or even thousands, of samples at once which clearly isn’t practical using this method. This is where scripting comes in.
Bash scripts:
- Let us automate repetitive tasks which reduces the chance of human error and takes less of our time (ie. run fastqc on 100 different samples)
- Allow us and others to see exactly what commands and parameters were used so that the work can be reproduced
- Let us submit our analysis to a high performance computer (HPC) or Amazon Web Server (AWS)
- Allow us to share our analysis with other scientists (on github for example) and to improve it over time
- Make it a LOT easier to write up the methods section of a manuscript for publication
4.1 Script Structure
Assignment 1 Part 2 asks you to write a script that runs from your home directory (~) and does the following:
- load software
- create a project directory and all other necessary directories
- obtain data
- perform analysis
Lets write a script to perform our quality control steps in the same way. To do this, we will first make a script that processes a single sample and then generalise it to run multiple samples.
We want our script to be nicely organised so that it’s easy to read and follow so let’s set up the structure/skeleton.
First, run cd ~ to get to your home directory, then use nano to make a new file called runqc.sh and set it up similar to the example below with descriptions that make sense to you.
#!/bin/bash

# Variables

# Load software

# Create directories

# Move into the Practical directory

# Get data

# Assess raw read quality with fastqc

# Trim with fastp

# Assess read quality after trimming with fastqc
4.2 Add code
Now we’ve got a skeleton for the script, we need to add the code.
Remember! Whatever commands you can run in the terminal, you can also put into a script and they’ll do the exact same thing (unless you’re using relative filepaths and aren’t running the command from the same location).
The first thing we do in a practical is activate our software so add source activate bioinf to your script in the “load software” section.
Next, we create some directories and obtain our data.
The code lines below are from Practical 4.
Some of this code is essential for the analysis in that it creates something that is used or required by a later step. However, some of it is not.
We want our script to be efficient and easy to follow so we only want to include code that is contributing to our analysis.
Go through the lines of code below and work out which lines are essential to analyse the ERR3241917 sample and which aren’t. Add essential code to the script skeleton in the appropriate location.
Take some time to look through and work it out. You could use the man or help pages to work out what commands do if you can’t remember.
mkdir --parents ~/Practical_alignment/{ref,0_raw,1_trim,2_align,3_variants}

tree Practical_alignment

cd Practical_alignment

## copy reference genome
cp  ~/data/intro_ngs/chr2_sub.fa ref/

## make symlinks for all .fq.gz files at once
ln -s ~/data/intro_ngs/*.fq.gz 0_raw/

tree .

zcat 0_raw/unknown_R1.fq.gz | head -n 4

fastqc -h | less

mkdir -p ~/Practical_alignment/0_raw/FastQC

cd ~/Practical_alignment

fastqc -o 0_raw/FastQC -t 2 0_raw/ERR3241917_*.fq.gz
The last two analysis steps that we need to include in our script are trimming and the final fastqc check.
Find these two commands in todays practical and paste them into your script. Make sure you create the necessary directories as well.
Once you’ve completed this, click HERE
4.3 Sanity and formatting check
Your script should now have all of the necessary code to run the entire quality control workflow for the sample ERR3241917. Let’s do some final checks before we test it.
Things to check:
- Make sure that all directories referenced by your
fastqcandfastpcommands are created before these commands run - If you have split a single command over multiple lines (you may have this for
fastp), there should be no spaces after the\(signifying that the command continues on the next line) at the end of each line. If there are spaces, nano should highlight them for you so you can remove them. - Check for typos and capitalisation. Bash is fussy.
- Make sure that you are in the right directory! This script is designed to be run/executed from your home directory but our analysis (from getting our data and onwards) uses “relative” filepaths that will only work when we are located in
~/Practical_alignment. Therefore, make sure your script changes into this directory after creating new directories and before obtaining your data. - To check that the script runs all the way to the end, add an
echo "end of script"or some other echo statement to the last line of your script.
4.4 Testing your script
If you don’t test your script, you can’t be sure that it doesn’t have errors. The best way to test a script is to run it in the way you are expecting other people to run it. For example, your assignment scripts will be placed in the home directory (~) of the person marking it and executed/run from there. None of the directories or data that you’ve created will exist yet and so your script will have to create them.
Therefore to properly test our script, we need to remove the original output files. However, instead of deleting them permanently, let’s rename the directory in case we want to go back and then run our script.
cd ~
# rename our Practical_alignment directory to Practical_alignment_original so that we can get our work back if we need
mv Practical_alignment Practical_alignment_original

#Run the script
bash runqc.sh
Did your script run? Take a look at the directory structure with tree to check.
tree Practical_alignment
If it didn’t, try reading the error messages to work out where your script went wrong.
4.5 Automating for multiple samples
One of the main reasons we write scripts is automation (to run the exact same code on multiple samples) but this script currently only processes one sample. Let’s modify it so that it processes all of our samples.
In this example we’ll use a for loop that iterates over our three sample names and runs the code inside of the loop for each sample. We will need:
- a variable that contains our three sample names
- A
forloop that iterates over this variable and contains the code that we want to run These elements are shown below with the full command for the firstfastqcstep included. Note how the sample name (ERR3241917) has been replaced with${SAMPLE}.
Take some time to look over this code and understand how it works.
# Variables
SAMPLES=(ERR3241917 ERR3241921 ERR3241927)

for SAMPLE in "${SAMPLES[@]}";
do
	fastqc -o 0_raw/FastQC -t 2 0_raw/${SAMPLE}_*.fq.gz

	<fastp command here>

	<fastqc command here>
done
Try and add this loop to your own script making sure that you replace all sample names inside of the loop with the ${SAMPLE} variable and include the full commands for fastp and fastqc.
To test your script again:
cd ~
# Delete the directory you created when you ran this script without the for loop
rm -rf Practical_alignment

# and Run the script again!
bash runqc.sh
Hopefully you managed to get all of the steps in the analysis to run properly! If not, go back and try to work out what went wrong.
Once this script has run, take a look through the FastQC reports for your newly processed samples to make sure you’re happy with the trimming process and final data quality.
And just before we go, let’s delete the Practical_alignment_original directory as the new Practical_alignment directory contains all of the same analysis for the first sample plus analysis of the second and third sample.
Check the rm command below carefully. It can’t be undone.
rm -rf Practical_alignment_original
# The -r option means recursive
# The -f option means "Force"
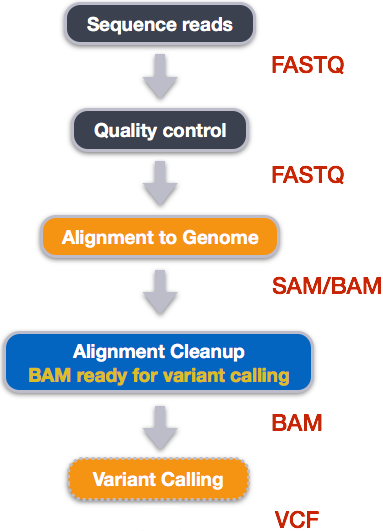
5. Summary of progress
Over the last two practicals we have:
- Obtained our raw reads with symlinks
- Used FastQC to assess quality of raw reads
- Used fastp to trim reads
- Used FastQC to re-assess quality of trimmed reads
- Written a script that runs all of these steps for us.
In the next practical we will do the next step in our variant calling workflow, align trimmed reads to the reference genome.