Bioinformatics_Overview
Introduction to Bash Part 2
Learning outcomes
After our first practical, you should be feeling a bit more confident working in a terminal environment. In today’s practical, we’ll build on that by introducing some core skills used in bioinformatics. By the end of the session, you should be able to:
- Understand how regular expressions (regex) works and use them to search text or sequence files.
- Use
grepto find patterns, count features, and tidy up output. - Work with the redirect symbol (
>) and pipes (|) to link commands together and save results to files. - Inspect real FASTA and GFF files and extract useful information from them.
Regular Expressions
Introduction
Regular expressions are a powerful & flexible way of searching for text strings amongst a large document or file.
Most of us are familiar with searching for a word within a file, but regular expressions allow us to search for these with more flexibility, particularly in the context of genomics.
For example, we could search for a sequence that is either AGT or ACT by using the patterns A[GC]T or A(G|C)T.
These two patterns will search for an A, followed by either a G or C, then followed strictly by a T.
Similarly a match to ANNT can be found by using the patterns A[AGCT][AGCT]T or A[AGCT]{2}T.
We’ll discuss that syntax below, so don’t worry if those patterns didn’t make much sense.
Whilst the bash shell has a great capacity for searching a file to matches to regular expressions, this is where languages like perl and python offer a great degree more power.
The command grep
The built-in command which searches using regular expressions in the terminal is grep, which stands for global regular expression print.
This function searches a file or input on a line-by-line basis, so patterns contained within a line can be found, but patterns split across lines are more difficult to find.
This can be overcome by using regular expressions in a programming language like Python or Perl.
The man grep page (grep --help | less for those without man pages) contains more detail on regular expressions under the REGULAR EXPRESSIONS header (scroll down a few pages).
As can be seen in the man page, the command follows the form grep [OPTIONS] 'pattern' filename
The option -E is preferable as it it stand for Extended, which we can also think of as Easier.
As well as the series of conventional numbers and characters that we are familiar with, we can match to characters with special meaning, as we saw above where enclosing the two letters in brackets gave the option of matching either.
| Special Character | Meaning |
|---|---|
| \w | match any letter or digit, i.e. a word character |
| \s | match any white space character, includes spaces, tabs & end-of-line marks |
| \d | match any digit from 0 to 9 |
| . | matches any single character |
| + | matches one or more of the preceding character (or pattern) |
| * | matches zero or more of the preceding character (or pattern) |
| ? | matches zero or one of the preceding character (or pattern) |
| {x} or {x,y} | matches x or between x and y instances of the preceding character |
| ^ | matches the beginning of a line (when not inside square brackets) |
| $ | matches the end of a line |
| () | contents of the parentheses treated as a single pattern |
| [] | matches only the characters inside the brackets |
| [^] | matches anything other than the characters in the brackets |
| | | either the string before or the string after the “pipe” (use parentheses) |
| \ | don’t treat the following character in the way you normally would. This is why the first three entries in this table started with a backslash, as this gives them their “special” properties. In contrast, placing a backslash before a . symbol will enable it to function as an actual dot/full-stop. |
Pattern Searching
In this section we’ll learn the basics of using the grep command & what forms the output can take.
Firstly, we’ll need to get the file that we’ll search in this section.
First change into your test directory using the cd command, then enter the following:
cp ~/data/intro_bash/words words
Now page through the first few lines of the file using less to get an idea about what it contains.
Let’s try a few searches, and to get a feel for the basic syntax of the command, try to describe what you’re searching for on your notes BEFORE you enter the command. Do the results correspond with what you expected to see?
grep -E 'fr..ol' words
grep -E 'fr.[jsm]ol' words
grep -E 'fr.[^jsm]ol' words
grep -E 'fr..ol$' words
grep -E 'fr.+ol$' words
grep -E 'cat|dog' words
grep -E '^w.+(cat|dog)' words
In the above, we were changing the pattern to extract different results from the files.
Now we’ll try a few different options to change the output, whilst leaving the pattern unchanged.
If you’re unsure about some of the options, don’t forget to consult the man page.
grep -E 'louse' words
grep -Ew 'louse' words
grep -Ewn 'louse' words
grep -EwC2 'louse' words
grep -c 'louse' words
In most of the above commands we used the option -E to specify the extended version of grep.
An alternative to this is to use the command egrep, which is the same as grep -E.
Repeat a few of the above commands using egrep instead of grep -E.
Capturing text is something you may want to do, however these operations in bash are beyond the scope of this course.
To perform this we usually use the Stream EDitor sed and this will be covered in part 2 of this practical.
For those who are interested, there is a tutorial available at http://www.grymoire.com/Unix/Sed.html.
For those wanting a quick cheat sheet to remind them of the different variables used in regex, the cheat sheet provided at https://cheatography.com/davechild/cheat-sheets/regular-expressions/ is a great resource. A useful pair of websites to test your regular expressions are available at https://regex101.com/ and https://regexr.com/. This can be very handy.
Using AI models to help develop grep regular expressions
Writing regular expressions can sometimes be difficult, especially if you are trying to execute a complex command. AI language models can help you develop, test, and understand regex commands by explaining what each part of a pattern does and iteratively suggesting improvements. They are especially helpful in troubleshooting, when you cannot seem to get a command you have written yourself to work properly.
It is important to remember that while AI models can be helpful in developing regex commands, it should not replace your own understanding. While they are able to generate correct answers in specific contexts, knowing how to tweak the command to fit your actual dataset is an invaluable skill, that will save you more time down the track.
Question
Here is a slightly more complicated regex command:
grep -E '^B.*(ics|ion)$' words
Ask an AI model to explain what this command does, step by step. Run the command on our dataset, and see if the result is what you expected.
While AI tools can be very helpful when writing code, they’re not always right. Sometimes an AI will confidently suggest code that looks correct, but actually doesn’t work. This is called a hallucination. Unless you have given it express permission to do so, the AI tool will not have access to your files, your data, or your computer; because of this it can make up file names or commands that don’t really exist. Because of this, it’s important to treat AI suggestions as a starting point, test them yourself, and always check the documentation or your output to make sure the code really does what you expect.
Standard Output
All of the output we have seen so far was ‘printed’ to your terminal.
Each function returned output to you using a data stream called standard out, or stdout for short.
Most of these tools also send information to another data stream called standard error (or stderr), and this is where many error messages go.
This is actually sent to your terminal as well, and you may have seen this if you’ve made any mistakes so far.
This basic data flow can be visualised in the following chart:
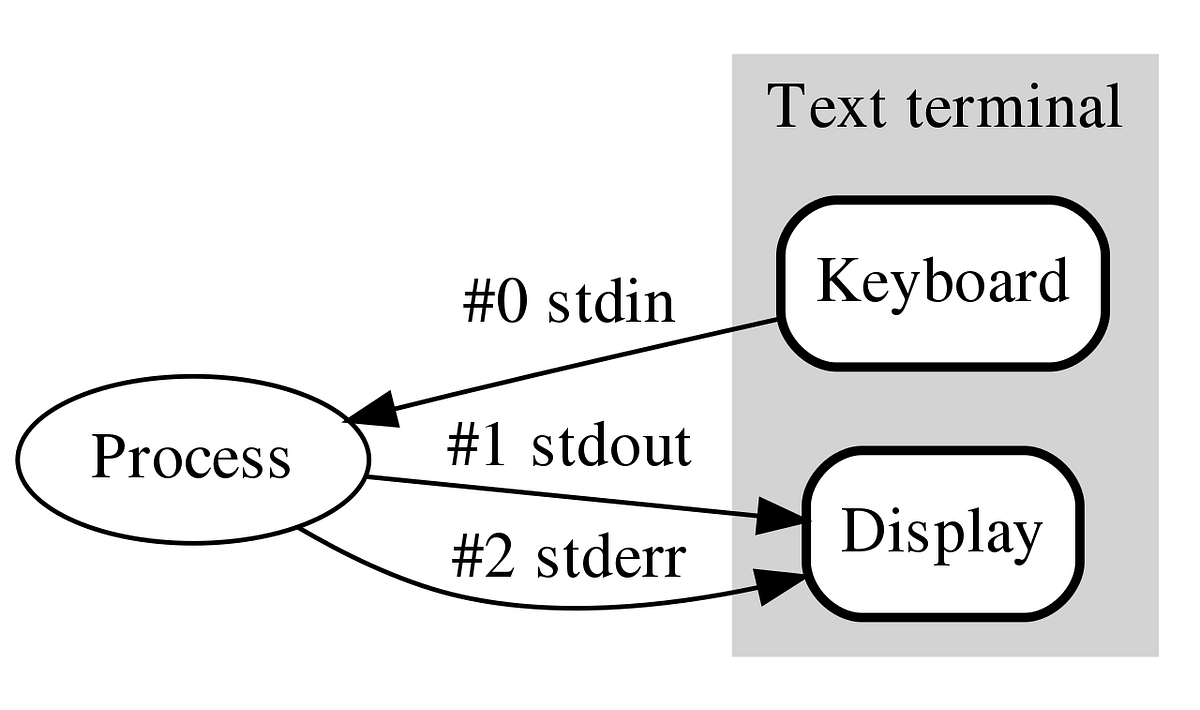
Note also that everything you’ve typed on your keyboard is sent to each command as a data stream called stdin.
Any guesses what that is short for?
Text In the Terminal
We can display a line of text in stdout by using the command echo.
The most simple function that people learn to write in most languages is called Hello World and we’ll do the same thing today.
echo 'Hello World'
That’s pretty amazing isn’t it & you can make the terminal window say anything you want without meaning it.
echo 'This computer will self destruct in 10 seconds!'
There are a few subtleties about text which are worth noting.
If you have man pages accessible, inspect the man echo page & note the effects of the -e option. (Unfortunately you can’t access this using echo --help.)
The -e option allows you to specify tabs (\t), new lines (\n) & other special characters by using the backslash to signify these characters.
This is an important concept & the use of a backslash to escape the normal meaning of a character is very common, as we saw with grep last time.
Try the following three commands & see what effects these special characters have.
echo 'Hello\tWorld'
echo -e 'Hello\tWorld'
echo -e 'Hello\nWorld'
As we’ve seen above, the command echo just repeats any subsequent text.
Now enter
echo ~
Why did this happen? Think back to the previous prac if you need a hint
Sending Output To A File
Using the > symbol
So far, the only output we have seen has been in the terminal (stdout).
In bioinformatics, it is common for us to want to redirect the output of a command to a file instead of printing it to standard output, and we do this using the greater than symbol (>), which we can almost envisage as an arrow.
As a simple example we can write text to a file.
Using the command echo prints text to stdout
echo "Hello there"
However, we can ‘capture’ this text and redirect it to a file using the > symbol.
echo "Hello there" > hello.txt
Notice that the text no longer appeared in your terminal!
This is because we sent it to the file hello.txt.
To look at the contents of hello.txt use either one of the commands less, cat or head.
Once you’ve looked at it, delete it using the command rm to make sure you keep your folder nice & tidy, as well as free from unimportant files.
Let’s get a more serious file to work with for today.
Make sure you are in your Practical_1 directory, then download the following file using curl
curl ftp://ftp.ensembl.org/pub/release-89/fasta/drosophila_melanogaster/ncrna/Drosophila_melanogaster.BDGP6.ncrna.fa.gz > Drosophila_melanogaster.BDGP6.ncrna.fa.gz
If we hadn’t placed the > symbol at the end of this command, curl would literally stream all of the contents of this file to stdout, but now we have redirected this to a file!
After you’ve downloaded this file, unzip it using gunzip.
Inspect the contents of the extracted file using head.
head Drosophila_melanogaster.BDGP6.ncrna.fa
This file is all the ncrna sequences from the current build of D. melanogaster in FASTA format.
A FASTA file is a simple text file used to store biological sequences, such as DNA, RNA, or proteins. Each entry begins with a line starting with a “>” symbol followed by a description,
and the next line (or lines) contains the actual sequence made up of letters representing nucleotides or amino acids.
As you can see, each sequence has a header row which begins with > so if we wanted to just collect the sequence headers we could use egrep and write the output to a file.
egrep '^>' Drosophila_melanogaster.BDGP6.ncrna.fa
This will just dump the information to stdout, and will appear as a stream of identifiers.
If we want to capture stdout and send it to a file, we can use the > symbol again at the end of the above command, and provide a filename to write to.
This will create the file as an empty file, then add the data stream from stdout to the blank file.
egrep '^>' Drosophila_melanogaster.BDGP6.ncrna.fa > SeqIDs.txt
less SeqIDs.txt
Once you’ve had a quick look at the file, exit the less pager (q) and delete the file using the rm command.
Using the >> symbol
Another alternative is to use the >> symbol, which only creates a blank file if one doesn’t exist.
If one with that name already exists, this symbol doesn’t create an empty file first, but instead adds the data from stdout to the end of the existing data within that file.
echo -e '# Sequence identifiers for all ncrna in dm6' > SeqIDs.txt
In this command, we’ve created a header for the file, and we can now add the information we need after this using the >> symbol.
This trick of writing a header at the start of a file is very common and can be used to add important information to a file.
Now let’s add another row describing where we’ve obtained the data from.
echo -e '# Obtained from ftp://ftp.ensembl.org/pub/release-89/fasta/drosophila_melanogaster/ncrna/Drosophila_melanogaster.BDGP6.ncrna.fa.gz on 2026-02-26' >> SeqIDs.txt
Have a look at the file using less
less SeqIDs.txt
Now we can add the sequence identifiers
egrep '^>' Drosophila_melanogaster.BDGP6.ncrna.fa >> SeqIDs.txt
Inspect this once again using less or head (Hint: Do not use cat for large files)
Redirection Using The Pipe Symbol
Sometimes we need to build up our series of commands & send the results of one to another.
The pipe symbol (|) is the way we do this & it can literally be taken as placing the output from one command into the input of the next (analogous to using a pipe and redirecting output somewhere new).
This is where thinking about the output of a command as a data stream can be very helpful.
This is a very conventional approach when working in bash and was the motivation behind the creation of the magrittr package in R.
As a simple example, we could take the output from an ls command & send it to the pager less.
ls -lh /usr/bin | less
Page through the output until you get bored, then hit q to quit.
Inspecting genomic files using bash
As you may have realised, these file types don’t play well with MS Word, Excel and the like.
We need different ways to look through these and as we go, hopefully you’ll get the hang of this.
First we’ll download the file GCF_000182855.2_ASM18285v1_genomic.gff for Lactobacillus amylovorus from the NCBI database. (wget is similar to curl for retreiving files, however does not require redirection. Alternately you can use curl as we did before.)
wget ftp://ftp.ncbi.nlm.nih.gov/genomes/all/GCF/000/182/855/GCF_000182855.2_ASM18285v1/GCF_000182855.2_ASM18285v1_genomic.gff.gz
gunzip GCF_000182855.2_ASM18285v1_genomic.gff.gz
This file is in gff format, which is very commonly used.
The first 9 lines of this file is what we refer to as a header, which contains important information about how the file was generated in a standardised format.
Many file formats have these structures at the beginning, but for our purposes today we don’t need to use any of this information so we can move on.
Have a look at the beginning of the file just to see what it looks like.
head -n12 GCF_000182855.2_ASM18285v1_genomic.gff
Notice the header/comment lines begin with one or two hash symbols, whilst the remainder of the file contains information about the genomic features in tab-separated format. As there is a lot of information about each feature, note that each line after the header will probably wrap onto a second line in the terminal. The first feature is annotated as a region in the third field, whilst the second feature is annotated as a gene.
Question
- How many features are contained in this file?
- If we tried the following:
wc -l GCF_000182855.2_ASM18285v1_genomic.gffwould it be correct?
This will give 4524, but we know the first 9 lines are header lines. To count the non-header lines you could try several things:
grep -vc '^#' GCF_000182855.2_ASM18285v1_genomic.gff
or
grep -c '^[^#]' GCF_000182855.2_ASM18285v1_genomic.gff
Make sure you understand both of the above commands as it may not be immediately obvious!
There are 9 header/comment lines we can see at the top of the file, is this the number that you got?
What do you think is going on?
As mentioned above, this file contains multiple features such as regions, genes, CDSs, exons or tRNAs. If we wanted to find how many regions are annotated in this file we could use the processes we’ve learned above:
grep -c 'region' GCF_000182855.2_ASM18285v1_genomic.gff
If we wanted to count how many genes are annotated, the first idea we might have would be to do something similar using a search for the pattern 'gene'.
Question
Do you think this is the number of regions & genes?
- Try using the above commands without the
-cto inspect the results. - Try searching for the number of coding DNA sequences using the same approach (i.e. CDS) & then add the two numbers?
- Is this more than the total number of features we found earlier?
- Can you think of a way around this using regular expressions?
Some of the occurrences of the word gene or region appear in lines which are not genes or regions. We could restrict the search to one of the tab-separated fields by including a white-space character in the search. The command:
egrep '\sgene\s' GCF_000182855.2_ASM18285v1_genomic.gff | wc -l
will give a different result again as now we are searching for the word gene surrounded by white-space.
Note that we’ve also used the pipe here to count results using the wc command.
We could have also used egrep with the -c flag set.
Using cut
Alternatively, there is a command cut available.
Call the manual page (man cut) and inspect the option -f.
man cut
We can simply extract the 3rd field of this tab-delimited file by using the f3 option.
cut -f3 GCF_000182855.2_ASM18285v1_genomic.gff | head -n12
(You can ignore any errors about a Broken pipe.)
However, this hasn’t cut the third field from the header rows as they are not tab-delimited.
To remove these we need to add one further option.
Call up the man page and look at the -s option.
This might seem a bit confusing, but this means don’t print lines without delimiters which would be the comment lines in this file.
cut -f3 -s GCF_000182855.2_ASM18285v1_genomic.gff | head
Now we could use our egrep approach and we know we’re counting the correct field.
cut -f3 -s GCF_000182855.2_ASM18285v1_genomic.gff | egrep -c 'gene'
But 2204 is greater than what we got when we searched for ‘gene’ surrounded by whitespace (2100).
What do you think could be happening? What is the difference between these two approaches that might explain this difference?
Let’s see exactly what features our second attempt is counting. We’ll use sort and uniq along with the pipe symbol to stream the output between commands.
cut -f3 -s GCF_000182855.2_ASM18285v1_genomic.gff | egrep 'gene' | sort | uniq -c
A similar question would be: How many types of features are in this file?
We can again use the command cut, along with sort and uniq.
cut -f3 -s GCF_000182855.2_ASM18285v1_genomic.gff | sort | uniq -c
In the above some of the advantages of the pipe symbol can clearly be seen. Note that we haven’t edited the file on disk, we’ve just streamed the data contained in the file into various commands.
Using awk
Sometimes we want to do more than simply extract fields from a file.
For this, we can use a very powerful command called awk.
The command awk is a common tool for working with and manipulating text files that are arranged in columns, such as GFF files.
You can open the manual page for more information:
man awk
Similar to cut, awk can split each line of a file into fields.
By default it splits on whitespace, but we can tell it to split on tabs (as used in GFF files) by using the -F option (F for field separator).
For example, to print the 3rd field of a tab-delimited GFF file, we can use:
awk -F"\t" '{print $3}' GCF_000182855.2_ASM18285v1_genomic.gff | head -10
Here:
-F"\t"tellsawkthat fields are separated by tabs{print $3}tellsawkto print the third field$1,$2,$3, … refer to columns 1, 2, 3, etc.
You will notice that the first 9 lines output by this command are blank. That is because this GFF header lines contains no tabs (only spaces), so awk cannot split them into fields. Try piping this output into less and scrolling down until you see results
awk -F"\t" '{print $3}' GCF_000182855.2_ASM18285v1_genomic.gff | less
While the output of awk is similar to cut -f3, awk also allows us to filter rows or process text more easily using simple conditions. One of the most useful features of awk is that it can both select rows and extract fields at the same time.
Filtering with awk
Instead of using a separate filtering command, we can ask awk to select only the rows we want.
For example, to print only the lines where the feature type (column 3) is gene, we can write:
awk -F"\t" '$3 == "gene" {print $3}' GCF_000182855.2_ASM18285v1_genomic.gff | head
This prints only those entries where the third column exactly matches gene.
A natural question is: What additional information is stored with each gene?
To learn this, we need to look at the 9th column.
The 9th column of a GFF file is called the attributes column.
It contains extra information about each feature in a semicolon-delimited format.
Each entry is a key–value pair, for example:
ID=gene-XYZ;Name=MyGene;gene_biotype=protein_coding
Common attributes include:
- ID — a unique identifier for the feature
- Name — a human-readable gene name
- gene_biotype — categories such as protein_coding, lncRNA, pseudogene
The 9th column is extremely useful because it is where most biological meaning (gene names, transcript relationships, functional categories) is stored.
We can print both the 3rd and 9th columns for gene entries:
awk -F"\t" '$3 == "gene" {print $3"\t"$9}' GCF_000182855.2_ASM18285v1_genomic.gff | head
This shows the feature type together with the attributes describing each gene.
Question:
Using the Name= attribute, what is the human-readable name of the first gene in this GFF file? What is its gene biotype?